The Mass DOI Import feature allows you to quickly import multiple contributions by DOI, automatically integrating information from CrossRef into your database.
To use it, you simply need to know the DOI identifier of the contribution you want to add.
This new feature can be used to:
– Import one or more contributions from a specific faculty profile.
– Import one or more contributions from the main menu, for different authors.
From a faculty profile
Importing via DOI allows you to quickly add one or more contributions to the profile of the same author within your institution.
This feature is available to users with the Admin role, as well as to faculty members, who can therefore import their own contributions into their profile.
Steps to follow
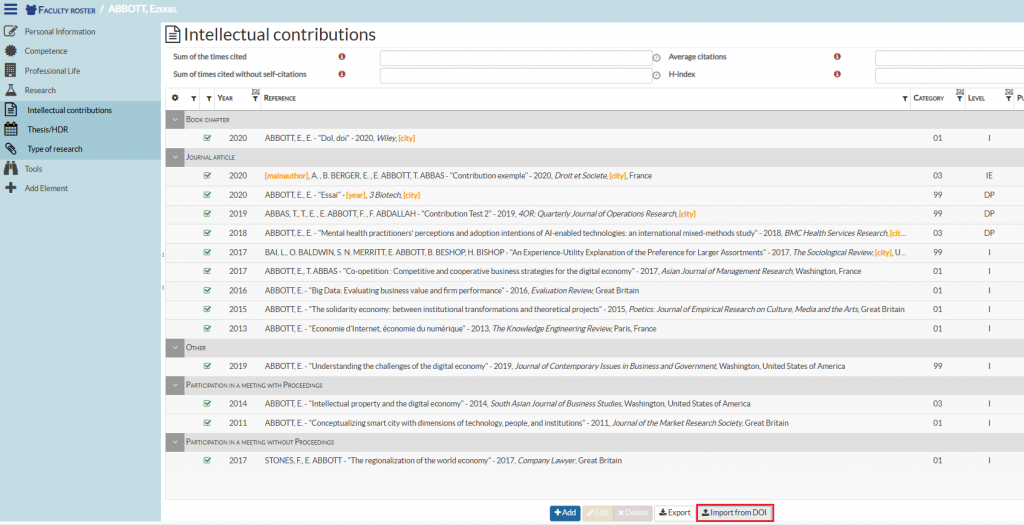
Go to the faculty profile from the faculty roster: edit the profile.
Select Research > Intellectual Contributions in the left-hand menu.
1. At the bottom of the list, select the Import from DOI button.
A window appears on the screen to start the import process.
2. Enter the DOI identifier(s) of the contributions to be imported into the author’s profile.
The identifiers can be entered as a list: separated by a line break (Enter), a comma, a semicolon, or even a space.
(You can therefore copy/paste a list of DOI links from an Excel file, for example.)
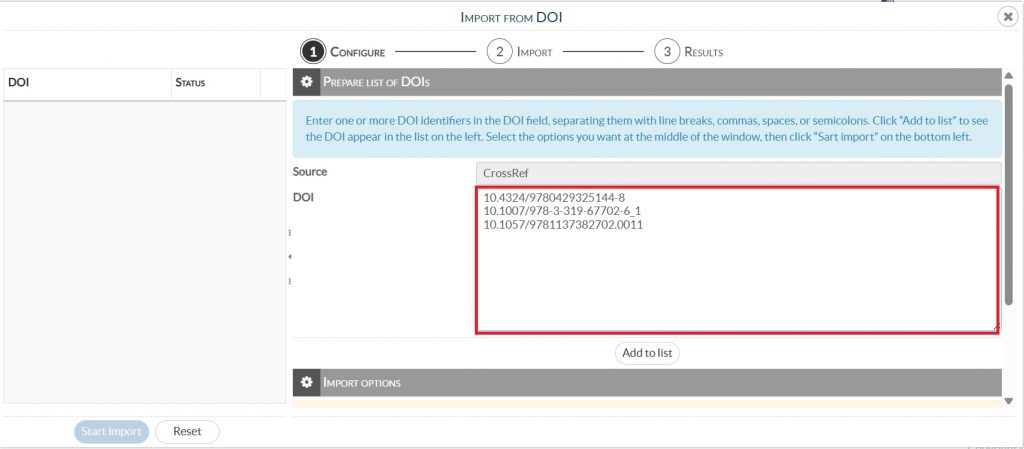
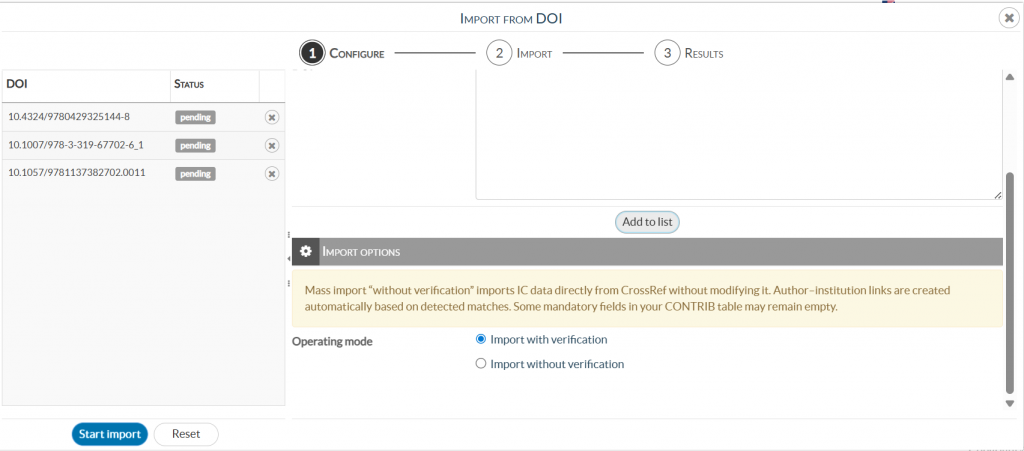
3. Then click the “Add to list” button: the DOI identifiers appear on the left side of the window, ready to be processed.
Before starting the processing of the list, select the Import options.
You can choose to perform this import with or without verification:
With verification
Importing with verification allows you to review and/or complete the contribution’s content before it is imported:
- Check or modify the author matching: This first step allows you to verify the suggested association between the contribution’s author on CrossRef and the faculty. A default match is proposed, which you can validate or modify if necessary.
– Click “Load” to move on to the next step.
– By clicking “Ignore”, you cancel the import of this contribution and move directly to the next DOI. - Verify or modify the contribution’s affiliation with the institution
- Complete the contribution information: The second step consists of reviewing and completing the contribution data in the add/edit window. Mandatory fields must be filled in to successfully finalize the import.
ℹ️ Importing with verification ensures reliable and complete data in your database.
Without verification
With import without verification, each DOI in the list is automatically processed and validated by the system. The contribution is then imported without any action required on your part.
Several behaviors are possible with this configuration:
- If the faculty appears among the authors of the contribution, it is automatically imported into their profile.
- If the faculty is not in the list of authors, you are offered two options:
– Reject the import of the contribution
– Import the contribution anyway: in this case, the faculty is added as an author.
You must also define how affiliations of internal and external authors will be managed during a bulk import.
You may choose to:
- Force internal affiliation
- Only use internal affiliation when the imported affiliation is missing in Academ.
- Force the imported affiliation
- Use imported affiliation when available; otherwise leave blank.
- Do not import affiliation: leave it blank
⚠️ The contribution will be imported into your database even if some required fields (as defined on the contribution add/edit screen) are missing.
We recommend minimizing the number of required fields to avoid major inconsistencies in your database.
ℹ️ By default, the import is performed with verification to help you maintain reliable and complete data in your database.
Select “Import without verification” if you want to carry out an automatic bulk import without manual action.
5. Once all import options have been configured, click the “Start import” button located at the bottom of the list on the left.
From the main menu
If you want to import multiple contributions published by different authors, you can now use the DOI import feature from the main menu.
Steps to follow
Go to Data Management > Import > Import by DOI
A window appears to start the import process.
1. Enter the DOI identifier(s) of the contributions to be imported into the database.
The identifiers can be entered as a list: separated by a line break (Enter), a comma, a semicolon, or even a space.
(You can therefore copy/paste a list of DOI links from an Excel file, for example.)

2. Then click the “Add to list” button: the DOI identifiers appear on the left side of the window, ready to be processed.
3. Before starting the processing of the list, select the Import options.
You can choose to perform this import with or without verification:
With verification
Importing with verification allows you to review and/or complete the content of the contribution before it is imported:
- Check or modify the matching with the authors present in your database:
This first step lets you verify the suggested association between the contribution’s authors and the internal or external faculty members in your institution. A default match is proposed, which you can validate or adjust if needed.
– Click “Load ” to move on to the next step.
– By clicking “Ignore”, you cancel the import of this contribution and move directly to the next DOI. - Verify or modify the contribution’s affiliation with the institution
- Complete the contribution information:
The second step consists of reviewing and completing the contribution data in the add/edit window. Required fields must be filled in to successfully finalize the import.
ℹ️ Importing with verification ensures reliable and complete data in your database.
Without verification
With import without verification, each DOI in the list is automatically processed and validated by the system. The contribution is then imported without any intervention on your part.
Several behaviors are possible with this import mode:
- If one or more authors of the contribution are recognized as internal authors in your database, the contribution is automatically imported into their profiles.
- If no internal author is detected, two options are offered:
• Reject the import of the contribution
• Import the contribution anyway, creating the authors as external.
You must also define how the affiliations of internal and external authors will be managed during a bulk import.
You may choose to:
- Force internal affiliation
- Only use internal affiliation when the imported affiliation is missing in Academ.
- Force the imported affiliation
- Use imported affiliation when available; otherwise leave blank.
- Do not import affiliations: leave it blank
⚠️ The contribution will be imported into your database even if some required fields (as defined on the contribution add/edit screen) are missing.
We recommend minimizing the number of required fields to avoid major inconsistencies in your database.
ℹ️ By default, the import is performed with verification to help you maintain reliable and complete data in your database. Select “Import without verification” if you want to perform an automatic bulk import without manual action.

4. Once all import options have been configured, click the “Start import” button located at the bottom of the list on the left.
| ⭐ Key Tips: Use With Verification to ensure accuracy and completeness. Use Without Verification for speed, but expect less reliable data. |