Screen rules can be customised in ACADEM to extend or restrict user actions:
- each field can be visible, read-only, mandatory or hidden.
- each tab and button can be accessible or hidden
Screens and fields can be configured for some given role only, or for all roles. It is also possible to configure screens according to the values selected in certain fields.
Screen rules can be accessed from the menu Other > Administration > Screen rule
ℹ️ To modify screen rules, we advise you to open ACADEM in two tabs, to make it easier to copy/paste useful information from one screen to another.
There are two types of screen rule:
▫️Standard rules: already in ACADEM by default and cannot be deleted or replaced.
▫️Custom rules: added by users to modify or specify the standard rules. They can be deleted or modified directly.
The standard rules are therefore a base, which can then be modified using custom rules.
⚠️Only users with a T1_admin + T1_admin Source System ACADEM role can access changes to the user interface.
See this article for more information on user roles ➡️ Roles and extensions
ℹ️ It is advisable to add comments to customised rules to keep track of changes.
To add a comment without affecting the screen rules, use // at the beginning of the line of code.
Accessing screen rules
To change the way a field, tab or button is displayed on the screen: position your mouse on the item to be changed and right-click > a box appears below the item: Edit field labels and tooltips > click on the box to access the editing window.
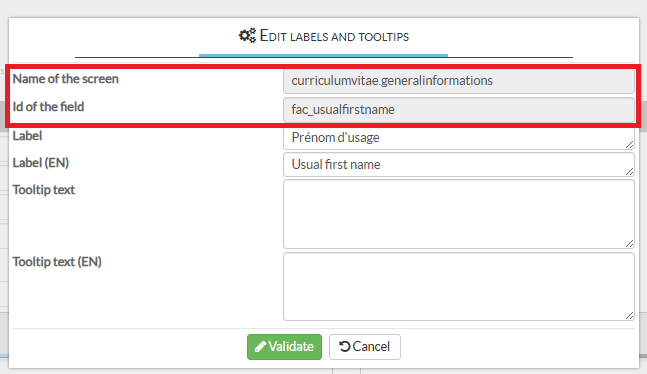
In the edit window, two main information are useful for consulting/change the screen rule associated:
- The name of the screen
- The field identifier
In a second tab: Find the name of the screen indicated in the Edit label and tooltips window, from the Screen rules in ACADEM.
Menu Other > Administration > Screen Rules

Select the name of the screen in the list, and click on Edit to read/modify the rules on this screen.
- Use the Standard Rules tab to view the existing rule(s) for the field to be customised.
- Use the Custom Rules tab to write the new rule(s) to be applied.
Writing a screen rule
ℹ️Screen rules are written as lines of code.
They are constructed as follows:
screen.ID_field.access=Access.instruction
For example, the rule: screen.typecontrib.access=Access.MANDATORY
Means: the type of contribution must be filled in.
⚠️The ‘screen.’, ‘.access=’ and ‘Access.’ elements shown in bold above, must not be modified in the code. They must surround the variables that identify the screen or instruction added in the rule.
⚠️ The word Access preceding the instruction must be written with a capital A, so that it can be understood by the system.
The basic instructions for fields are :
▫️To hide a field: Access.HIDDEN
▫️To make the field read-only: Access.READ
▫️To make the field mandatory: Access.MANDATORY
▫️To be able to fill in/edit the field, without obligation: Access.WRITE
The basic instructions for tabs and buttons are:
▫️To make a tab or button visible: Access.SHOW
▫️To hide a tab or button: Access.HIDDEN
ℹ️ These instructions also apply to the display of the Address and Contact boxes in teacher profiles > Personal information
In Practice
To hide the ‘Usual first name’ field on the faculty profile:
- The screen name is curriculumvitae.generalinformations
- The field identifier is: fac_usualfirstname
The screen rule to be written will therefore be:
screen.fac_usualfirstname .access=Access.HIDDEN
By validating this screen rule, the usual first name field will no longer appear in the faculty profile for any user.
Writing a conditional screen rule
Rules conditional on user roles
Writing a custom rule can open or restrict access to fields, tabs/buttons, depending on the user’s role.
1/ ⚠️Before writing a conditional rule for one or more roles, a reminder of the roles definition rules must be copied/pasted into the custom rules.
These roles definition rules are presented in the introduction to the standard rules, with a prefix “def”
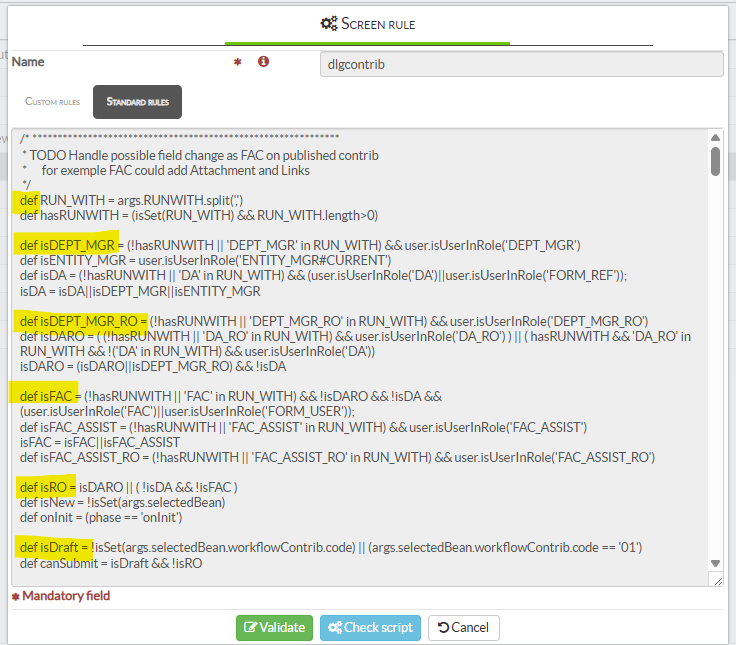
Copy/paste all the definition rules, which begin with the prefix ‘def’, before writing the instructions that apply to specific roles.
In this way, the system knows which users are or are not affected by these new custom rules.
2/ After adding the ‘def’ definitions, write a condition to modify the display of a field (tab or button):
With the formula ‘if(isROLE) and {}’.
For example : if(isFAC)
{
screen.ID_field.access= Access.HIDDEN
}
The rule means: if the user has a FAC role, all the instructions entered between {} are applied = in this case, the field is hidden.
Or on a single line, using the formula isROLE?Access.instruction: Access.instruction
For example : screen.ID_field.access = isDA ?Access.WRITE : Access.HIDDEN
The rule means that if the user has a DA role, the field is visible and can be modified. For all other roles, the field is hidden.
The condition on a line can be translated as follows: Does the user have the AD role? If yes (true), the field is visible and can be modified: if no (false), the field is hidden.
Rules conditional on the value of a field
It is also possible to condition access to fields, tabs and buttons on the values selected in certain fields on the screen.
ℹ️For example, on the screen for editing an intellectual contribution: when the type of contribution is an Article = a Support tab appears, to enter the media in which the article was published.
To do this, you need to define a new variable that will retrieve the current value of a field on the screen, in this form :
def myValue = screen.myField.value
If the field is a referential table, we retrieve the value code:
def myValue = screen.myField.value.code
Under the variable, the screen rule can be written as follows:
def typecontrib=screen.typecontrib.value.code
switch(typeContrib) { case “01”: // Article screen.contrib_tab_support.access = Access.SHOW}
This rule means that if the intellectual contribution type is ‘Article’, the Support tab appears in the edit window.
Our team is available to help you write the rule(s) you need to customise your screens.
Contact us from your Redmine space to let us know what you need ➡️ Using Redmine